| 维爱迪-动画创作家园 >> 动画名家 >> KEYTOON 制作组专访(下) |
 |
|
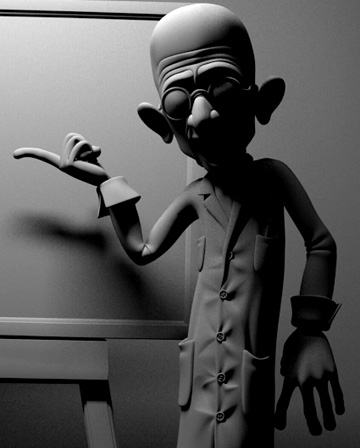
| In this rendering, Dr. Maxwell does not have any texture since this scene is little more than the evolution of a facial test that we liked and decided to embellish a little. 在这张渲染图中,Maxwell博士并没有被赋予贴图,直到这个场景经过更多的脸部测试让我们基本确定了一些修改。 The Dr. Maxwell of the short film we are developing has textures and more details, but we will speak of that some other time. 在Maxwell博士的短片中我们改进了一些贴图和更多细节,我们将在稍后在说明这个问题。 |
|
|
|
|
| Then we have the easel, with a very big tileable wood texture, UV-mapped so the repetition of the texture in the object is not obvious. 我们制作这个黑板架,给它上了一张非常大的花木质贴图,完全是按照UV贴图的方式循环使用的,所幸这并不很明显。 The blackboard is made with a hand painted textured, starting from a green color and drawing with Wacom several outlines and stains that we tried to blot, soil and to erase to give the blackboard a very used quality. Once we created the base, we chalked several rare scientific formulas, drawings of Dr. Maxwell and even a rough diagram of the 3ds max interface that lends the image a funny touch. 黑板是用一张手绘贴图制作的,起初在一片绿色中我们用Wacom数位板绘制大概的模样,并且加上一些(自然的)斑点和瑕疵,就像灰尘和抹擦的效果,给黑板一种被长期使用的材质感觉。当我们完成底板之后,我们用粉笔加了若干科学公式(然后做擦去效果当背景),画上的是Maxwell博士手绘的粗糙的3Ds Max界面,起一些幽默的点缀作用。 Overall, we used specular and glossy shaders to be able to reflect the environment and give more realism to the materials. In the case of the gums or teeth it wasn't much more than a tweak to the glossiness parameters to obtain the right degree of ‘wetness'. 全面的修改时,我们用镜面反射和光泽阴影去放射环境色来达到更真实的材质效果。在制作牙齿和牙龈的时候没有什么比扭曲光泽参数更能体现“湿润”的效果了。 The skin is the mixture of the right color, specular parameters, glossiness and a specific positioning of the lights that we will explain later on. We thought about using subsurface scattering in the skin, but as Dr. Maxwell was not yet mapped we decided to use the color and brightness only. 皮肤的制作是混合了真实颜色,镜面反射参数,高光和光源设定的特殊配置,我们稍后会解释。我们考虑过用漫反射来体现皮肤,但是Maxwell博士还没有被绘制好贴图时我们就决定仅仅用色彩和高光来表现了。 |
|
|
|
|
|
Animation |
|
|
|
|
| Although this scene does not have animation, we made several poses of the model. Some of them came from our imagination directly, but the best thing is to use real references. We took our digital camera and had an amusing time exploring poses that could be used. Very often it's good to take some time taking photos, looking in the mirror, or recording yourself in a camera. It's lets you take a step ahead when you've got a creative block. 虽然这个场景并没有动画,不过我们为这个模型也做了不少姿势。有一些是我们凭空想象的,但是最好的还是要借助真实的参考资料。我们用数码相机捕捉下瞬间的姿势来尝试使用。常常花时间来照照片,观察自己在镜子(里的样子),或者观看自己的照片。当你在创作时遇到阻力的时候这样能带给你一些启发。 |
|
|
|
|
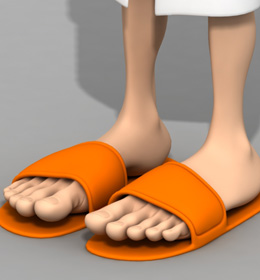
| Dr. Maxwell rendered in default pose, Middle: For the hands and the feet Jaime used him own limbs as reference. Maxwell博士默认姿势的渲染图,居中:手和脚是用了Jaime自己的肢体做参考的。 |
|
|
|
 |
|
Black board painting |
Dr. Maxwell's feet |
|
Lighting/Rendering |
|
|
|
|
| At first we wanted to use maxwell render as the render engine. We have two years of experience as beta testers, but as we could not show any image with it until the program is released, we decided to use another rendering engine. Now that maxwell render is out, we have returned to use this great new renderer for the scene. 一开始我们想用Maxwell渲染器做渲染引擎。我们在测试数据上具备两年的经验,但是在这项程序被公布之前我们是不可一透露任何图片的,(后来)我们决定了用另一个渲染器。现在Maxwell渲染器已经出来了,我们可以重新使用这个伟大的渲染器渲染场景了。 First we did a simple light setup to test different positions for the main light. These tests were made with white materials and without textures to study how the light behaves everywhere. Once the placement of the main light was final liz ed and the volume of the objects looked right, we placed filling lights. 起初我们用一个简单的光源设置去测试主光源的不同位置摆放。这样的测试同样进行在白色材质和没有贴图的物体上(用来了解)怎样让光线表现在任何地方。一旦主光源的位置被最终确定,并且多数物品看起来感觉良好,我们就开始加上补光。 We made the lights with boxes of different sizes to be able to show shadows of varying sharpness according our purpose. After this we applied maxwell render emitting materials with different colors and intensities. 我们在配置灯光的时候用不同大小的正方体(来代替实际物品的位置)便于展示和了解阴影是否达到我们想要的那种锐化度。之后我们应用Maxwell渲染器运用不同的颜色和强度制作材质。 After there was a solid foundation for the illumination, we switch to the final materials. We altered the lighting, putting in more low-intensity lights where necessary to enhance some specific areas in the scene. We put an orange light below the character to improve the color of Dr. Maxwell's skin. 灯光的基础打好之后我们转换到最终材质。我们改变灯光,在场景中必要增强表现细节的地方放进更低量度的灯光。我们还放置了一盏橙色的灯在人物的下方来改进Maxwell博士皮肤的颜色。 Finally the lighting was finished and we just needed to adjust the tone mapping, the exposure and aperture of the camera to complete the image. 最后灯光设置结束后我们仅仅需要调节贴图色调,和摄影机曝光度和光圈大小来完成这张图片。 Who are keytoon? |
|

|